The Riveted Roost
  • Home
  • Adventures
  • Contact

Alumaflamingo To Do List

2/13/2014

3 Comments

 
Picture
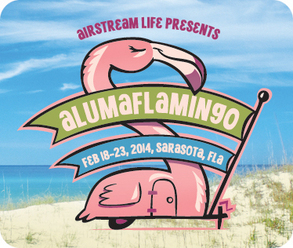
We have less than a week to go before we head to AlumaFlamingo in Sarasota and we still have so much to do! Here's what we've accomplished in the last month or so:
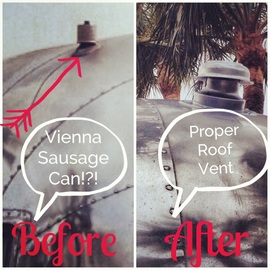
  • Replaced roof vents (the one above the bathroom was a Vienna Sausage can installed by a previous owner!)
  • Replaced or repainted all vents on the exterior walls of the trailer, replaced all screens to keep creepy crawlers out!
  • Sealed all windows and reshaped the "eyebrow" shades above each window as many had been bent over time
  • Removed all fixtures, tub, sink, countertop and cabinet from bathroom
  • Primed and painted the interior of the kitchen closet where the hot water heater and refrigerator will go, along with the area that will be used as a pantry
  •  Primed and painted the bathroom


Picture
  • Fiberglass repair to tub, sink and countertop
  • Applied preliminary coats of Tubby to tub and bathroom sink/counter
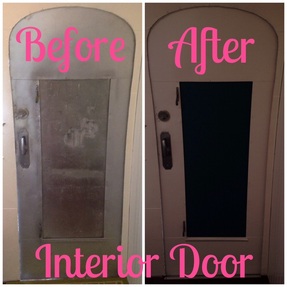
  • Painted the interior of the entry door and used chalkboard paint for the swing out portion that exposes the screen door
  • Installed hot water heater (although it is not hooked up yet, just mounted in the closet area in the kitchen, curbside)
  • Installed Astradome (had to create a new frame, purchase and attach new lifters first!)
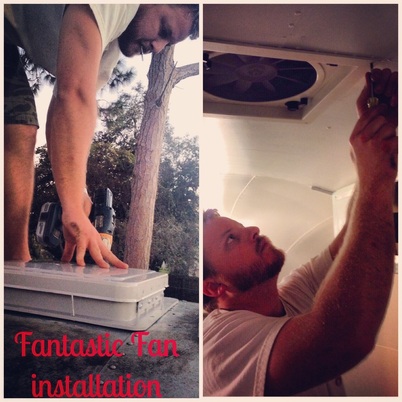
  • Installed Fantastic Fan vent in the rear cabin

Picture
PictureReady or not, here we come!
Here's what we need to accomplish in the next few days before AlumaFlamingo:
  • Finish applying the Tubby coating to the tub and bathroom sink/countertop, let dry as long as possible before installing back in trailer
  • Build box/shelf around hot water heater to support refrigerator above
  • Install plumbing and holding tanks for gray water
  • Install tub, counter, sink, faucets and cabinets into bathroom
  • Make shower curtain and rear cabin divider curtain (thank you, Polly!)
  • Install remaining window screens
  • Install screen for entry door and apply weather stripping
  • Install new tires and hubcaps
  • Rivet Riva's underbelly so it doesn't come loose again like it did on our way home from Key West
  • Install 12 volt battery
  • Remove and wash all dishes, utensils, bedding
  • Do a good bug bombing now that all the holes and cracks have been sealed
  • Clean interior
  • Wash exterior
  • Remove the fence panel in the backyard so we can hitch Riva up and move her up front
  • Create a menu plan and go shopping for food and supplies
  • Pack up all our food, supplies, equipment, bikes

I hope we can get all this accomplished in the limited amount of time we have left. Wish us luck!

Follow our adventures on Twitter @RivetedRoost, or find us on Facebook and Instagram.

3 Comments

Subflooridian, Part II

3/28/2013

0 Comments

 
PictureDinette, before
{By Justin}

It didn’t take long for me to realize that our banquette was sitting on of top rotten plywood.

I knew the subfloor was shot the first time we stepped inside Riva. Most people would never realize it’s a problem until they actually see the damage, so it’s important to notice how the flooring feels when you step into a vintage camper.

Does it feel soft or creek when stepped on? A subfloor should feel solid and firm. If it doesn’t, then you’ll most likely need to replace a section or two somewhere down the line.

While the previous owner had constructed a fine banquette, it still didn’t hide the fact that it took up too much room and that was sitting right on top of the worst section of subfloor.

The entire subfloor in the front-end cap needed to be replaced, which meant  the banquette had to go and something else put in its place.

Up until now, we had every intention of repurposing the banquette into our redesign, but soon realized that keeping it would’ve been a bad move.

In lieu of the banquette, we decided to go with a futon, which would provide a nice couch and sleeping area. We would eat outdoors mostly, and if it was raining, we could sit on the futon couch and use TV trays. The banquette was difficult to get in and out of anyway.

Picture
The rotten subfloor where the dinette used to be
Follow our adventures on Twitter @RivetedRoost, or find us on Facebook and Instagram.
0 Comments

Subflooridian

2/21/2013

0 Comments

 
PictureIt's gotta get ugly before it gets better. The full size pink commode must go!
{By Justin}

Kelly gives me a hard time about planning things out. I tend to do projects at my own pace, but there’s usually a method to my madness. 

Sometimes I breeze down our checklist, but there are times when I move at a snail’s pace and spend hours on something that appears simple from an outside perspective. 

It was clear when we bought our 26-foot aluminum can that the subfloor would be an issue and some areas needed replacing. I tried to remain positive, but the visible water damage on the tongue-and-groove wood flooring was a glaring imperfection that suggested otherwise. 

When we finally moved the Riveted Roost into the backyard, I knew I’d have to pick a day where I was free to curse, spit, drink beer and get to work without offending anyone. So one Saturday, Kelly left for a horse show at 6 a.m. and I was working on the trailer by 7. I started by removing the full-size pink porcelain toilet from rear of the trailer so that I could begin ripping out the wood flooring. 

The toilet came out with ease, as did the wood planks, so I proceeded to rip out about ¼ of the flooring to access the entire rear end cap subfloor. After about 20 minutes on my hands and knees I stepped away to open a beer. It was about 8 a.m., but sometimes that’s just the fuel the body and mind needs for something like this. 

PictureJustin standing Fred Flintstone-style in the camper
The previous owner lived in the trailer full-time and removed the original camper toilet and holding tank. I’ll give him a little credit though, he replaced the entire end cap subfloor; however, he didn’t fix the leak in the roof and his plumbing joints leaked, which meant I needed to replace a 2-foot section of subfloor. No big deal, I thought. 

As I continued to remove more of the wood flooring I began to see additional signs of water damage behind the street side (port/left) wheel well. I tried to remain optimistic, but each wood plank I pulled revealed more and more water damage. 

Once I removed all the flooring, I stepped away to grab another beer, not sure what time it was. The oat sodas were keeping my mind limber and going down the hatch nice and smooth. 

Some people are tidy when it comes to deconstruction and probably use proper foot and eye protection. Not me. I rip, yank and saw my way through the process while wearing flip flops, board shorts and a T-shirt. 

PictureNew plywood subfloor installed
I accumulated a decent pile of wood outside the trailer door and after a quick sweep, I was finally able to get a good look at the subfloor. I didn’t like what I saw and proceeded to open another beer. 

Parts of the subfloor were OK, while other parts had been replaced and some had rotted as much as a foot from the sidewalls. The subfloor beneath the refrigerator was previously replaced, but the wall and roof vents leaked (probably the refrigerator, too) and that section needed to be replaced again. 

I also discovered an interesting solution to repair an outlet. Instead of replacing the damaged outlet behind the refrigerator, the previous owner decided to tie in a 2-ft section of extension cord that hung freely from the outlet opening in the wall. Black electrical smoke stains suggested the outlet failed a long time ago and we’re lucky it didn’t burn the Airstream to the ground. 

Picture
Really?!?! An interesting solution to repair an outlet
The rotten subfloor near the window-mounted A/C unit didn’t come as a surprise, but I wasn’t sure how far into the front end cap the rot had progressed, since the dinette was covering it up. It was time for another beer. To be continued...

Follow our Airstream adventure on Twitter @RivetedRoost, find us on Facebook and Instagram.
0 Comments

Strip tease

1/24/2013

0 Comments

 
{By Kelly}

Our first order of business was to take inventory of what needed to be replaced on our 1960 Land Yacht. Here's what we came up with during our initial inspection of the Airstream:
  • Vents (1 would be replaced with a rooftop A/C unit, 2 with vents)
  • The window A/C unit needed to come out and be replaced with aluminum sheeting
  • Several windows were cracked
  • All screens would need to be replaced
  • The full-size pink porcelain toilet would need a lighter, road-worthy replacement
  • The existing flooring needed to be removed so we could examine the plywood sub-floor
  • Exterior and interior lights/fixtures needed to be replaced
  • Fix or replace entrance step
  • Refrigerator would need to be replaced (wasn't original anyway)
  • Holding tanks were non-existent, as the camper had been hooked up to a septic system. New fresh, gray, and black water tanks will need to be installed
PictureDrawers & doors before, in shades of mint & light blue
It appeared that the front vent had leaked, so Justin fashioned a makeshift vent to keep water out until a new vent could be installed. 

Numerous repairs would need to be made, as well as an electrical, propane and plumbing assessment.

We started with a task we knew we could tackle. Justin removed all the drawers, cabinet doors and hardware so we could strip the paint. It was obvious that there were many thick layers and sanding simply wouldn't suffice.

The chemical stripping process revealed that the wooden cabinetry had been painted at least three shades in the past 52 years: first pink, then turquoise, and then a mint green or light blue most recently. It appears from my research that the original cabinets in the 1960 Airstreams were unpainted and just had a coat of varnish.

PictureJustin, the [paint] stripper
Some cabinet doors were in poor shape due to insect invasion and others had been replaced for unknown reasons. We decided that we would need to paint all the cabinets and install new facings in a few areas to achieve a uniform appearance.

After stripping the doors and drawers, we sanded the remaining paint away. Justin filled in holes with wood putty, repaired any damaged veneer, and replaced the faces of a few drawers that were beyond repair. 

I taped off the edges to prepare them for a fresh coat of paint, but alas, it was all just a tease. Now they sit in our carport, as Justin discovered several other issues that needed to be addressed before we can even begin to think about painting and reinstalling the cabinet doors and drawers. [SIGH]

As you can see from some of the photos, above, we still needed to move the Airstream out of our driveway. AND she needed a name...

Picture
50 Shades of turquoise, pink, mint and blue
Picture
Drawers and doors: AFTER and ready for paint
Follow our Airstream adventure on Twitter @RivetedRoost and find us on Facebook and Instagram.


0 Comments

    About

    Follow Kelly and her dog Remington on their adventures with a 1960 Airstream Overlander, The Riveted Roost.

    Adventures

    March 2019
    September 2016
    April 2016
    November 2015
    August 2015
    July 2015
    June 2015
    March 2015
    February 2015
    December 2014
    October 2014
    September 2014
    July 2014
    May 2014
    April 2014
    February 2014
    December 2013
    September 2013
    June 2013
    May 2013
    April 2013
    March 2013
    February 2013
    January 2013

    Topics

    All
    Airstream
    California
    Colorado
    Florida
    Kitchen
    Louisiana
    National Park
    New Orleans
    North Carolina
    Recipe
    Restoration

    RSS Feed

Powered by Create your own unique website with customizable templates.